For those of who have been following this blog for a while now, you will have noticed I completely overhauled my website/blog to have an entirely new design, along with a new domain name, and a new hosting service. In this blog post, I would like to go over how I went about overhauling the website, as well as some of my reasons for doing so.
Why?
In the previous iteration, this blog was built on Jekyll, and hosted on GitHub Pages, without a custom domain. While that setup worked out well enough for starting out, I found myself in the market for a different static site generator, and consequently, a new service to host my website. While Jekyll served my needs well enough for the short term, I increasingly found that my lack of Ruby knowledge was making things difficult for me. Furthermore, as this was the only Ruby project I have ever worked on, I didn’t really have much incentive to immerse myself in the language. Also, there were certain features that Jekyll required third party packages and extra configuration to implement, such as pagination, which I felt should have been included by default.
Choosing a Static Site Generator
With this in mind, I set out on finding a new static site generator. The two main alternatives to Jekyll that I looked at were Pelican and Hugo. While Pelican certainly appealed to me, being a Pythonista and all, I ultimately decided to opt for Hugo, due to the fact that did not require any setup or configuration (other than downloading and installing a binary), the extensive selection of quality themes, as well as its incredibly fast, and auto-reloading, development server. In addition to that, even though Hugo is written in Go, it is not a package for the language that requires Go to already be installed. Instead, to install Hugo, one simply either downloads an installer from the Hugo website, or installs it through a package manager. I opted for the later of the two.
Building the Website
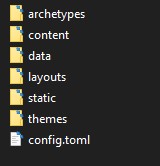
With a choice of a new static site generator made, I set out to start redeveloping my website. I will not detail every aspect of re-building the website, since that is far too much territory to cover in a single blog post. Therefore, I will just give a very high-level overview here. Once Hugo is installed, creating a new Hugo website is a simple as using the handy SDK that Hugo comes with by running hugo new site <site_name>.

The project structure generating by Hugo
Ultimately, I do not consider myself a front-end web developer, or any kind of expert on CSS. Therefore, rather than code the entire website from scratch, I made to choose to use one of Hugo’s pre-built themes from their gallery. Eventually, I settled on a rather nice theme called Notepadium. To apply this theme, you would first clone the git repo for the theme into your project’s theme directory with git submodule add <theme_url>. Then, open your config.toml file.
In the top of that file, you would then modify the theme variable to be equal to hugo-notepadium, and (optionally) set style to “dark”, if you want a dark version of the theme. At this point, you can start adding Markdown files to the content directory, such an about.md, or some blog posts to a directory called blog, posts, or something to that effect.
Hosting
Since GitHub Pages is powered by Jekyll, which I am no longer using, I found myself in need of a new hosting service. For static websites, I found the most ideal option to be Netlify. Netlify not only allows you to host static sites for free, but also allows you to easily add a lot of functionality to them, that would normally be associated with web applications that have server-side code. Netlify also makes it very easy to automate deployments by connecting a git repository to your Netlify project, so that any commits that are pushed to a specific branch of your remote repository are automatically deployed to Netlify.
Final Thoughts
Currently, I am quite satisfied with the new setup. Although I still have a lot to learn about Hugo, and everything I can do with it, I found it pretty easy to get started with. Furthermore, while the theme I chose was pretty nice as well, I should note that even though I used a pre-built theme for this site, I did add at least of some of my own, custom styles to it. I am also highly satisfied with Netlify thus far, as it really does enable one to push the boundaries of what can be accomplished with a simple, static website.