After multiple previous failed attempts, I am finally starting to get the hang of Apache Airflow and, even with a relatively basic mastery, I have been able to do some pretty interesting things with it.
What is Airflow?
Apache Airflow is a Python-based tool for scheduling and automating various workflows. It was originally created at AirBnB as an internal tool, and later open-sourced, under the Apache license. It has since become a top-level project at the Apache Foundation.
Since its creation in 2015, Airflow has become an industry standard tool for data engineering.
The central concept in Airflow is the Directed Acyclic Graph, or DAG. That may sound really abstract, but a DAG is essentially just a collection of related tasks to be executed in a specific order. Using DAGs, we can schedule and automate just about kind of workflow, from ETL and machine learning pipelines to sending automated emails.
Also essential to Airflow is the concept of Executors. Executors are basically what Airflow uses to actually schedule execution of the DAGs that you create. There are multiple different executors that Airflow supports, but in this demo, we will be using the LocalExecutor.
The Project
For this demonstration, we will be building an ETL pipeline to update a database of global exchange rates, against USD. Although the project I worked on featured two DAGs, I will only be showcasing one of them in this demonstration, as the logic for both pipelines is rather similar.
Getting Started
For awhile, this was probably what I had the most trouble with: simply setting up an adequate development environment. Manually installing and setting up Airflow can be notoriously difficult. Also, it does not work on Windows altogether, which is the operating system I use. Fortunately, this is where Docker comes in handy.
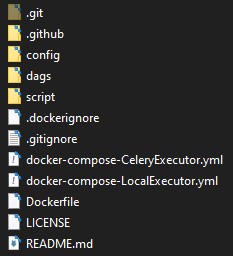
A fellow named puckel on GitHub has an open-source repository on GitHub of a pre-configured Airflow development environment that uses a custom built Docker image, along with Docker Compose, and other configurations. This massively simplifies things. The repository has the following structure:

Once the repository has been cloned, we need to create a .env file to store environment variables for our containers. Put the following environment variables in the file:
POSTGRES_USER=airflow
POSTGRES_PASSWORD=airflow
POSTGRES_DB=airflow
LOAD_EX=n
EXECUTOR=Local
SQL_ALCHEMY_CONN=(SQL Alchemy connection string)
AIRFLOW__CORE__FERNET_KEY=(a pseudo-random string generated for database encryption)
For this article, we will just be concerning ourselves with the dags directory, as that is where we will be storing the logic for our pipelines.
Now, that we have that sorted out, we can move on to actually writing a DAG.
Authoring a DAG
This project will consist of two DAGs: One for an initial seeding of the database, and another to update the database. Let’s start with the DAG to seed the database. This DAG will consist of three tasks, defined as Python functions, and appropriately named “extract”, “transform”, and “load”. In order to create a DAG, and assign tasks to it, we my first instantiate the DAG class, and pass in some arguments. For our seed_rates DAG, the logic will look like this:
from airflow import DAG
from airflow.operators.python_operator import PythonOperator
from datetime import datetime, date
from requests import get
from os import getenv
import pandas as pd


"""
DAG for initial seeding of the db, or overriding of existing table.
You should only need to run this once.
"""

default_args = {
    "owner": "airflow",
    "start_date": datetime(2020, 11, 1),
    "retries": 1,
}

dag = DAG("seed_rates", schedule_interval=None, default_args=default_args)


def extract(**context):

    data = get(f"https://api.exchangeratesapi.io/history?start_at=1999-01-01&end_at={date.today()}&base=USD").json()
    # Create an XCOM for this task to be used in transform()
    context['ti'].xcom_push(key="data", value=data)


def transform(**context):

    # Fetch the JSON data from the above XCOM
    data = context["ti"].xcom_pull(key="data")
    # Load relevant JSON in DataFrame for processing
    df = pd.DataFrame(
        data['rates']).transpose(
        ).reset_index(
        ).rename(columns={
            "index": "dates"
        }
    ).drop(['USD'], axis=1)

    context['ti'].xcom_push(key="df", value=df)


def load(**context):

    df = context["ti"].xcom_pull(key="df")
    db_conn = getenv("SQL_ALCHEMY_CONN")
    df.to_sql(
        'rates_history',
        db_conn,
        index=False,
        method='multi',
        if_exists='replace',
    )


with dag:

    t1 = PythonOperator(task_id="extract", python_callable=extract, provide_context=True)
    t2 = PythonOperator(task_id="transform", python_callable=transform, provide_context=True)
    t3 = PythonOperator(task_id="load", python_callable=load, provide_context=True)

    t1 >> t2 >> t3
Ok, I realize that is a whole bunch of logic that probably looks rather confusing, so let’s break it down piece by piece. First, following our imports, we define some default arguments as a dictionary to pass in when we instantiate our DAG class. When we instantiate the class, we pass in a string ("seed_rates") for our DAG id, followed by how frequently we want the DAG to be executed, as well as the default_args defined earlier.
Next, we define the Python functions for the extract, transform, and load tasks. In this case, I relied primarily on pandas for manipulating the data. You may notice that the terms xcom and context are frequently used throughout the code base. In Airflow, cross-communications, or “XComs” essentially allow data to be shared between different tasks in a DAG. These is essential for our ETL pipeline, as the data in question needs to be manipulated in different ways by each of our respective tasks.
Now that we have the logic for all our DAG’s tasks defined, we can actually instantiate our tasks. We do this by instantiating Airflow’s various operator classes. In this example, we will be using the PythonOperator like so:
with dag:

    t1 = PythonOperator(task_id="extract", python_callable=extract, provide_context=True)
    t2 = PythonOperator(task_id="transform", python_callable=transform, provide_context=True)
    t3 = PythonOperator(task_id="load", python_callable=load, provide_context=True)

    t1 >> t2 >> t3
After instantiating our tasks in the with dag block, we can then use the bitwise >> operators to define the order in which we want our tasks to be executed. In the above code, we have scheduled things so that our extract task is run first, followed by transform, and ending with load. With that, we finally have all the logic for our DAG sorted out. Now, we can run our ETL pipeline.
The Admin Interface
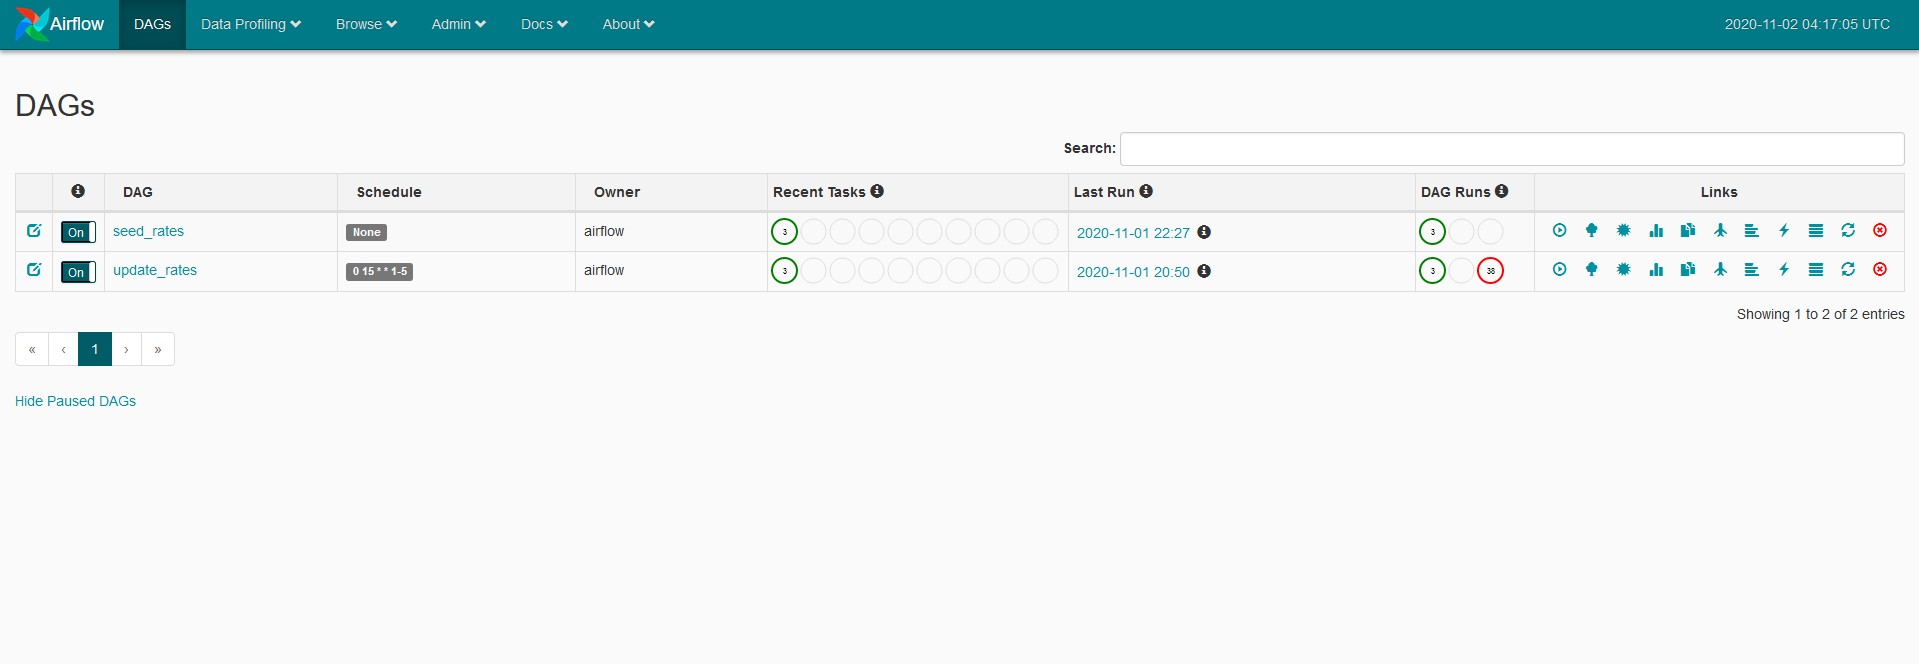
Among it’s many awesome features, Airflow also comes with a handy web admin interface for running and debugging DAGs. Once you run docker-compose up, you can navigate to localhost:8080/admin in your browser, and you will see an interface that looks like this:

Because our seed_rates DAG does not run on a schedule, it has to be executed manually. While Airflow also features a CLI for running DAGs, we will be using the admin web UI to run the seed_rates DAG. If we click on the “Trigger DAG” button on the left-hand side of the Links section in the above image, that will manually execute the DAG and it’s tasks. After running the DAG, we can view the logs for it. If we select the logs for the most recent DAG run, we can go to the graph view to if our tasks ran successfully.

The green outlines of the tasks in the graph view indicate that the tasks ran without a hitch. If we were to click on one of the task icons, we could view the standard output for the tasks.
Final Thoughts
Having an at least decent comprehension of Airflow is going to me allow to implement all sorts of interesting data engineering solutions going forward. However, the work we did here barely scratches the surface of what Airflow is capable. Airflow can, at least in principle, be used to schedule and automate almost any kind of workflow. The entire codebase for this project can be found here.